Cable routing and trenches
How DC, AC and medium-voltage runs are routed, what the conductor and trench totals mean, the cable schedule, and how edits and hand-drawn trenches change the cabling.
Cable routing turns a placed layout into cable lengths you can cost: string cables from the tables to the inverters, feeders from the inverters onward, and medium-voltage runs from the control rooms to the main control room. It also reports trench lengths, which are a different quantity from conductor lengths and are reported separately.
None of it happens unless you ask for it. Calculate cables is off by default, and with it off the string cables and the feeders are not routed.
Turning cable calculation on
The option is the first row of the Cables card on the Electrical tab — see Cables for the card and its three DC allowances. Ticking it raises the Cable Calculation — Performance Notice: cable calculation can take a long time on large or complex layouts. The buttons are Enable Now and Not Now (Recommended), and the recommended one is the default.
Take the recommendation. The useful sequence is:
Generate without cables first
Leave Calculate cables unticked and click Generate Layout. You get the tables, the capacity, the control rooms and the arresters quickly, which is what you need in order to judge whether the layout is right at all.
Fix the layout inputs
Row pitch, table configuration, the capacity block, obstructions — settle all of it while runs are fast. Cable routing on a layout you are about to change is work thrown away.
Tick the option and run once more
With the layout settled, enable cable calculation for the final run and read the lengths. Cable routing is the slow step on a large plant, and every plant is routed — none is skipped for its size.
With cable calculation off you still get the inverter and monitoring-box counts — those come from the string arithmetic, not from routing — and every cable and trench row of the Summary view reads a dash. See Inverter settings for the string limits that set those counts.
What is routed in each electrical design
The inverter design you chose at launch decides which legs exist. A conductor multiplier is applied to each leg, because a route drawn once on the plot is not the same as the cable you buy.
| Leg | Route | Counted | Why |
|---|---|---|---|
| String cables | Each table to its inverter | × 2 | A DC string needs a positive and a negative conductor over the same path |
| AC cables | Each inverter to its ICR | × 1 | A three-phase AC feeder is counted once along its route |
ICR is the inverter control room — the building the AC feeders terminate in. Which ICR an inverter feeds is decided as described under Which control room each device feeds.
Summary rows: String DC cable (m) for the string cables and AC cable to ICR (m) for the AC feeders.
Every inverter or SMB gets its own routed feeder to its control room, on every plant, drawn and counted in full. Both designs then have medium-voltage cables from the control rooms onward, which work the same way in either.
Where the inverters go
Inverters — or string monitoring boxes, in a central-inverter design — are not placed on a fixed grid. They are grouped from the positions of the tables themselves: the tables are gathered into spatial clusters, and one inverter serves each cluster, so a unit sits inside the group of tables it collects rather than at an arbitrary point.
Each one is then sited in the gap band between two rows — the pitch gap that already exists for shading — so the inverter does not cost you a table. A placed string inverter is drawn as a 2 m east–west × 1 m north–south marker.
How many there are is set by the string limits on the inverter card, not by the routing.
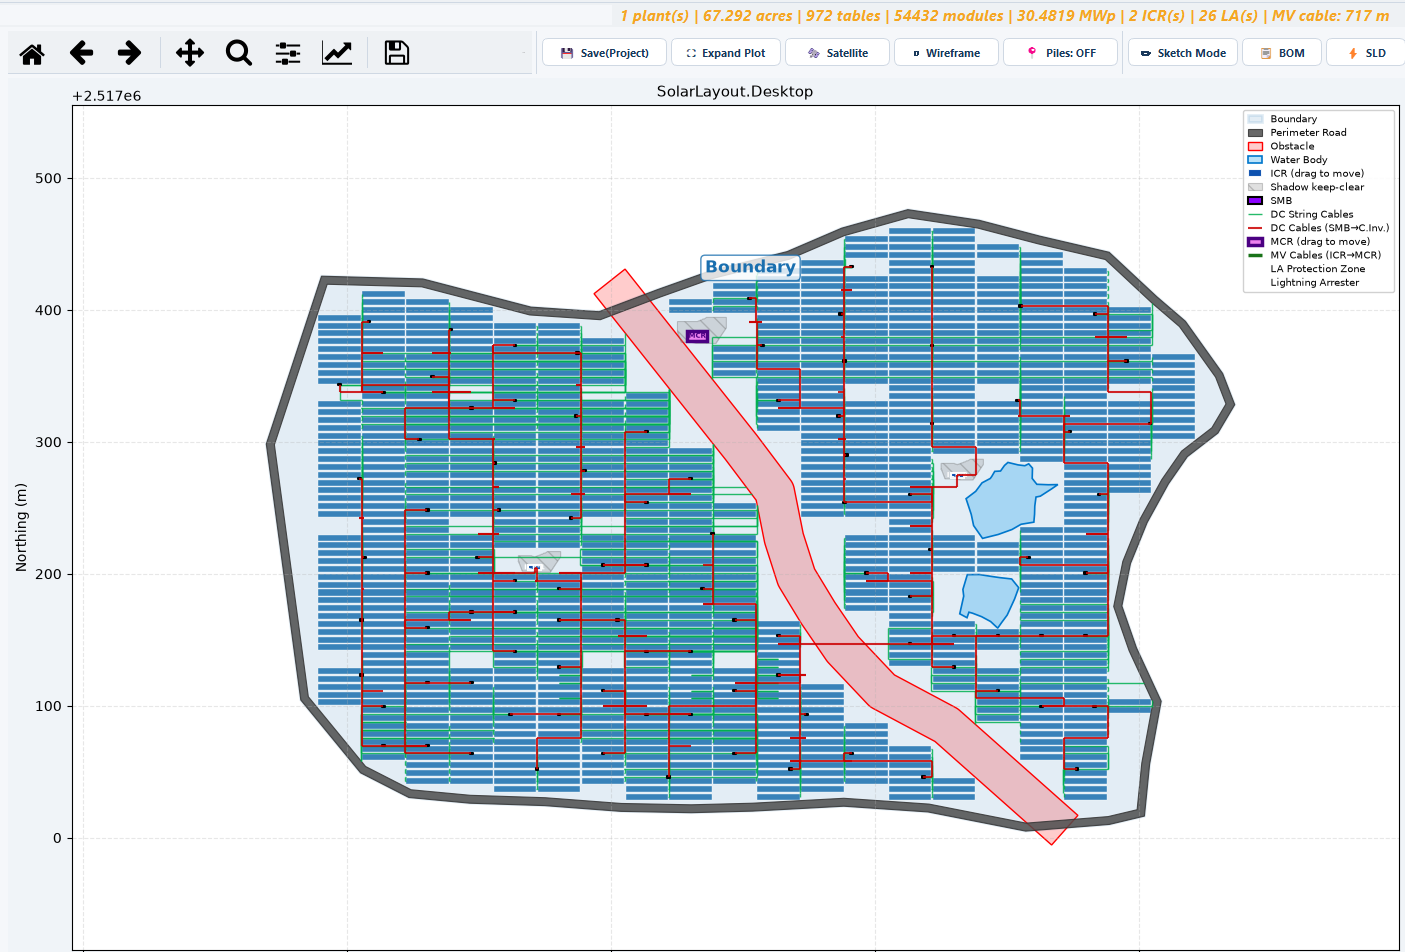
Which control room each device feeds
Each inverter or SMB starts on the control room nearest along the plant — measured over the ground inside the boundary, not in a straight line — up to that building's rating: the ICR Block capacity divided by the capacity of one inverter or SMB, rounded up. On a plot with a single control room every device feeds it.
A building over its rating hands devices on to a neighbour, in short hops: each device may move only to one of its five nearest control rooms, and only to one no more than one and a half control-room spacings further away than its nearest. When no such hop finds room, the excess is shared across the lighter buildings. A building still over its rating afterwards is reported as the design warning ICR over rating. See Design warnings.
So the ICR positions shape the AC total as much as the inverter positions do.
How a route is found
Right angles only. Every route is made of horizontal and vertical segments. There are no diagonals, because a cable trench across a solar plant follows the row and column grid the plant is built on — that is how it is dug and that is how it is cabled.
A series of routing patterns is tried in turn. The application works through a fixed sequence of right-angled path shapes between the two endpoints and takes the first one that stays on available ground. If none does, a bounded search looks for a way round, and a last-resort route always returns something connected.
What each run is kept to:
- DC string cables are clipped to the usable area, so they stay off the perimeter road band and out of the excluded ground.
- AC feeders, and the DC trunks of a central-inverter design, are held inside the plant boundary wherever a route can be found. A run that cannot be re-routed inside keeps its original path — in the drawing, the CAD export and the quantities — and is reported as the design warning Trench outside plant. A run that still crosses a table is reported as Trench under a table. These checks need Calculate cables on.
Because the last-resort route always succeeds, a route is always produced. On an awkward boundary — a narrow waist, a deep notch, a corridor cutting the plant in two — that route can be considerably longer than the run an engineer would draw, and it is still counted in the totals. Read the design warnings, switch the cable layers on and look at the long runs before you cost them.
Segments that several inverters share through the same corridor are counted once. Routing many inverters toward the same control room naturally puts them on a common path for the last stretch, and that stretch is one trench, not one per inverter.
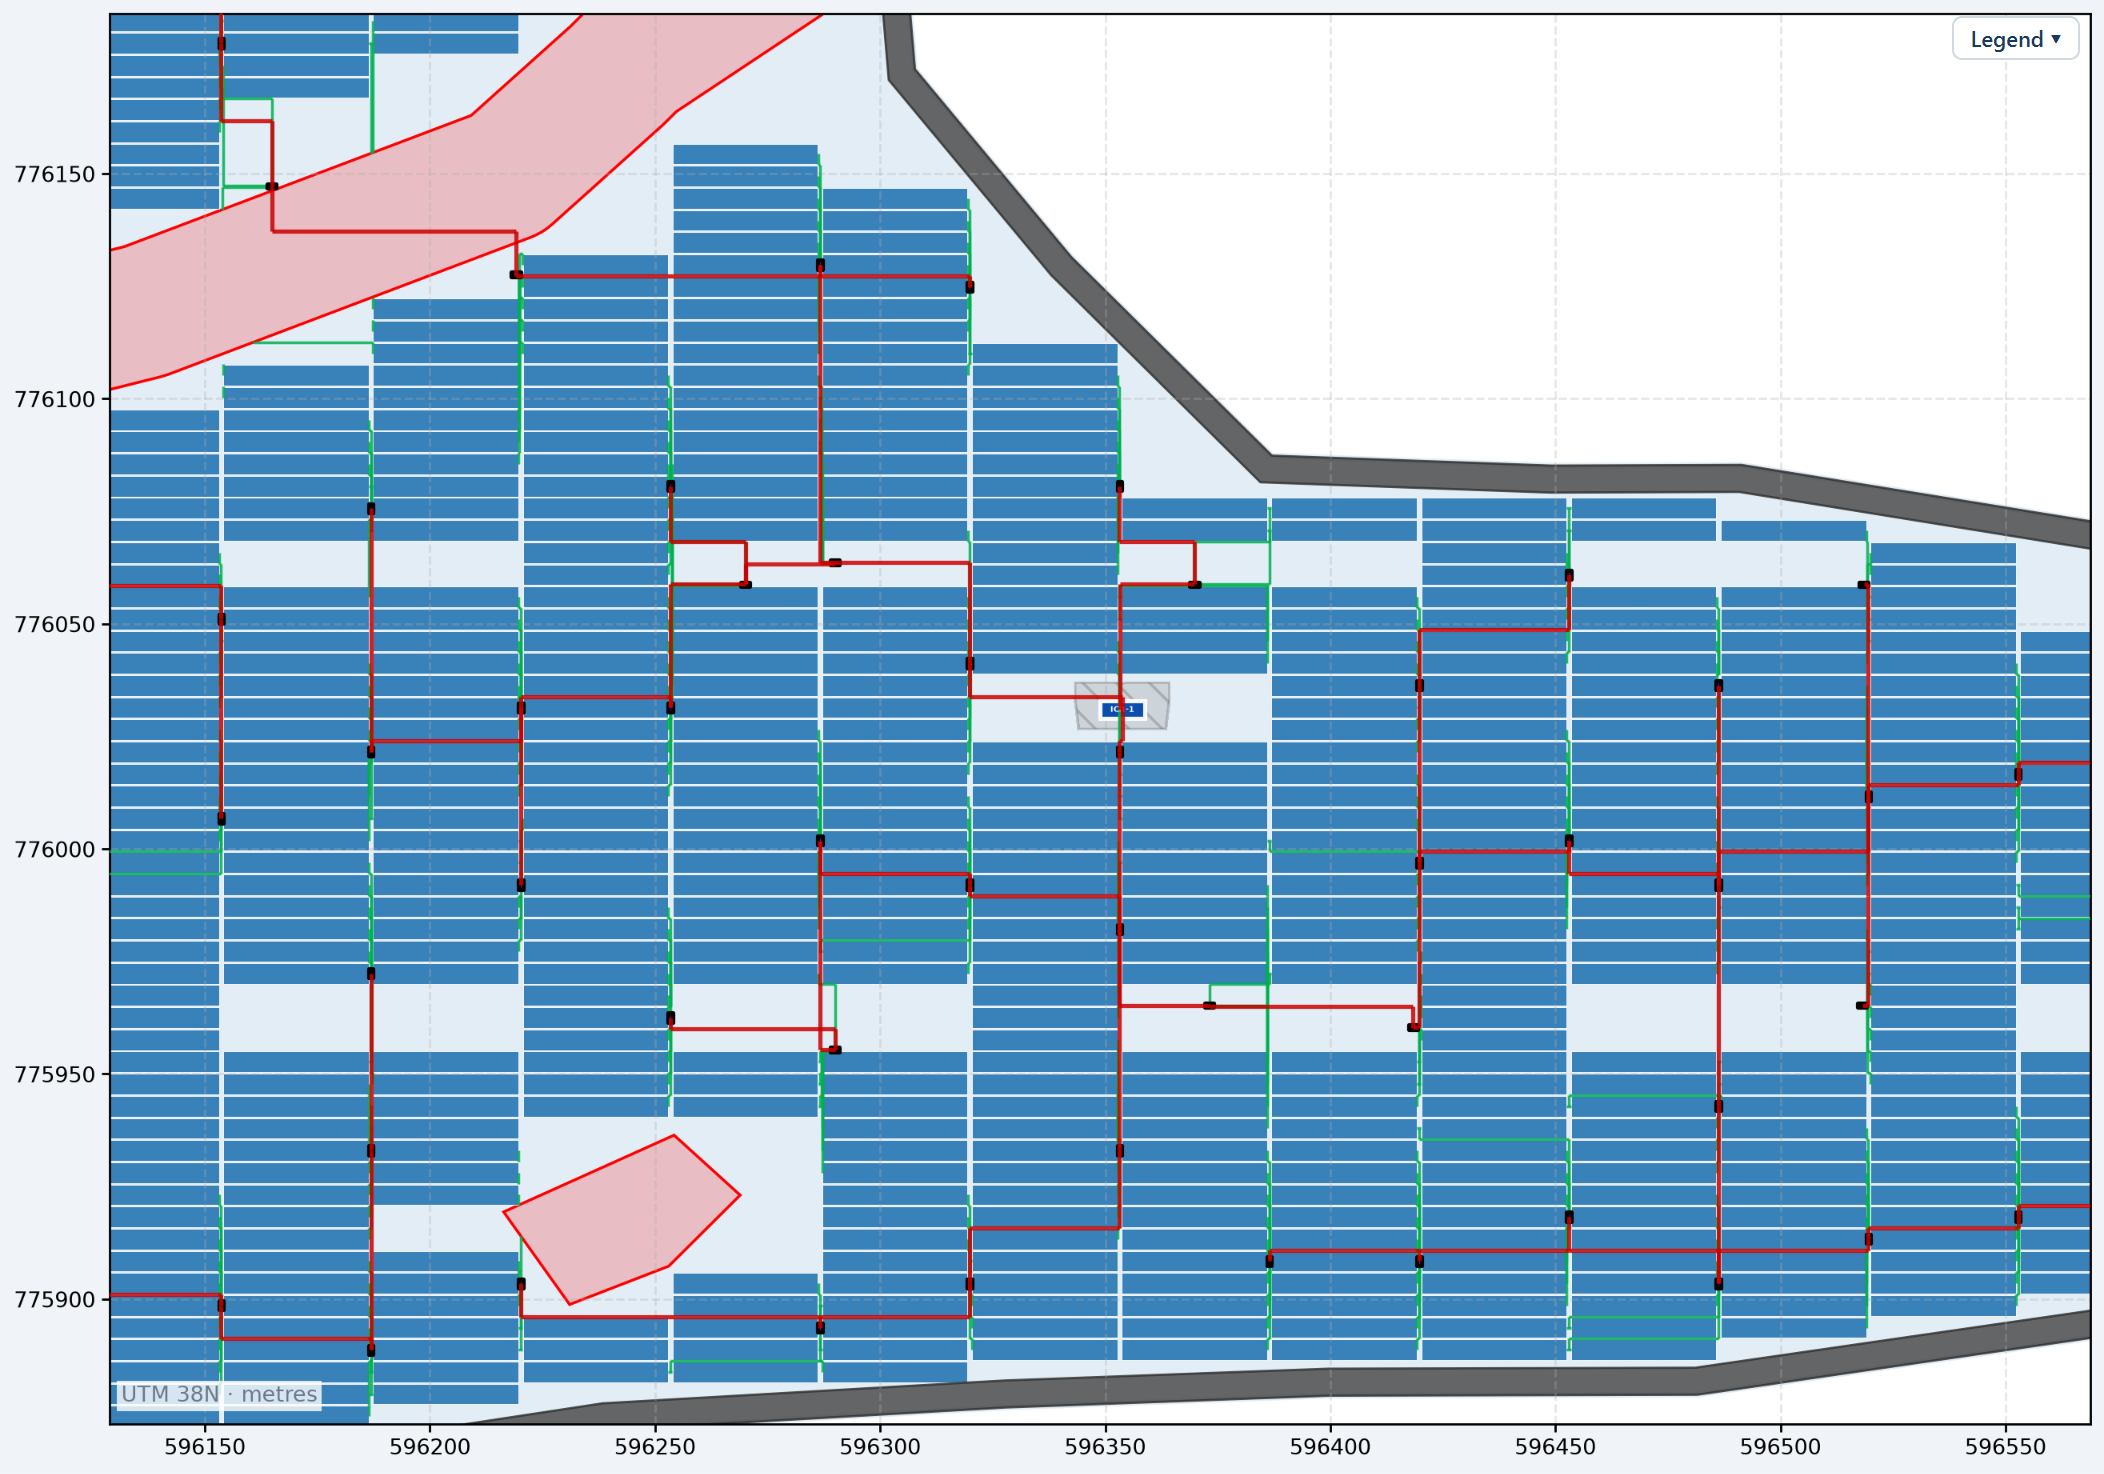
Very large plots
On a plot with more than 200 inverters or SMBs, the devices are clustered per ICR block and each is set at a gap corner, but every cable is still routed, drawn and counted in full.
On a plot that also has more than 30,000 tables, the DC string cabling — the comb of runs from the tables to each inverter or SMB — is drawn for a sample of eight clusters per ICR block. Only those clusters appear on the DC cable layer and in the drawing. The DC string cable total is worked out from a model calibrated on the sample, and the DC trench is the drawn trench scaled up by all the plot's tables over the tables drawn. The feeders from each device to its control room are still routed in full.
That scaled DC trench is labelled (est.): the bill of materials row reads DC String Trench (est.) with the remark drawn for a sample of clusters, scaled to all tables, and the PDF summary page and the Word report's trench row mark the figure the same way. On such a plot, treat both the DC string cable and the DC trench as estimates.
Medium-voltage cables
Medium-voltage — MV — cables run from each inverter control room to the main control room. They are not routed one by one. All the control room exit points and the main control room entry point are connected as a single shared-trunk network, so control rooms that are near each other feed into a common trunk instead of running parallel lines across the same ground to the same destination. That is both what gets built and what costs less.
Each branch of the network carries a termination allowance of 10 m, covering the terminations at its ends over and above the routed distance.
Nothing medium-voltage is routed until the main control room is placed —
there is no destination before that — and placing it routes nothing either.
The medium-voltage cables are routed on the next Generate after
Place MCR, with Calculate cables on. Until then the hint under the
placement buttons reads "MCR placed. Enable 'Cable Calc' and regenerate layout
to route MV cables.", the MV row of the Layers popover has nothing to show and
the Summary's MV cable (m) reads —. After that run the status line adds
"| MV cable: n m". See
Main control room, substations and street lights.
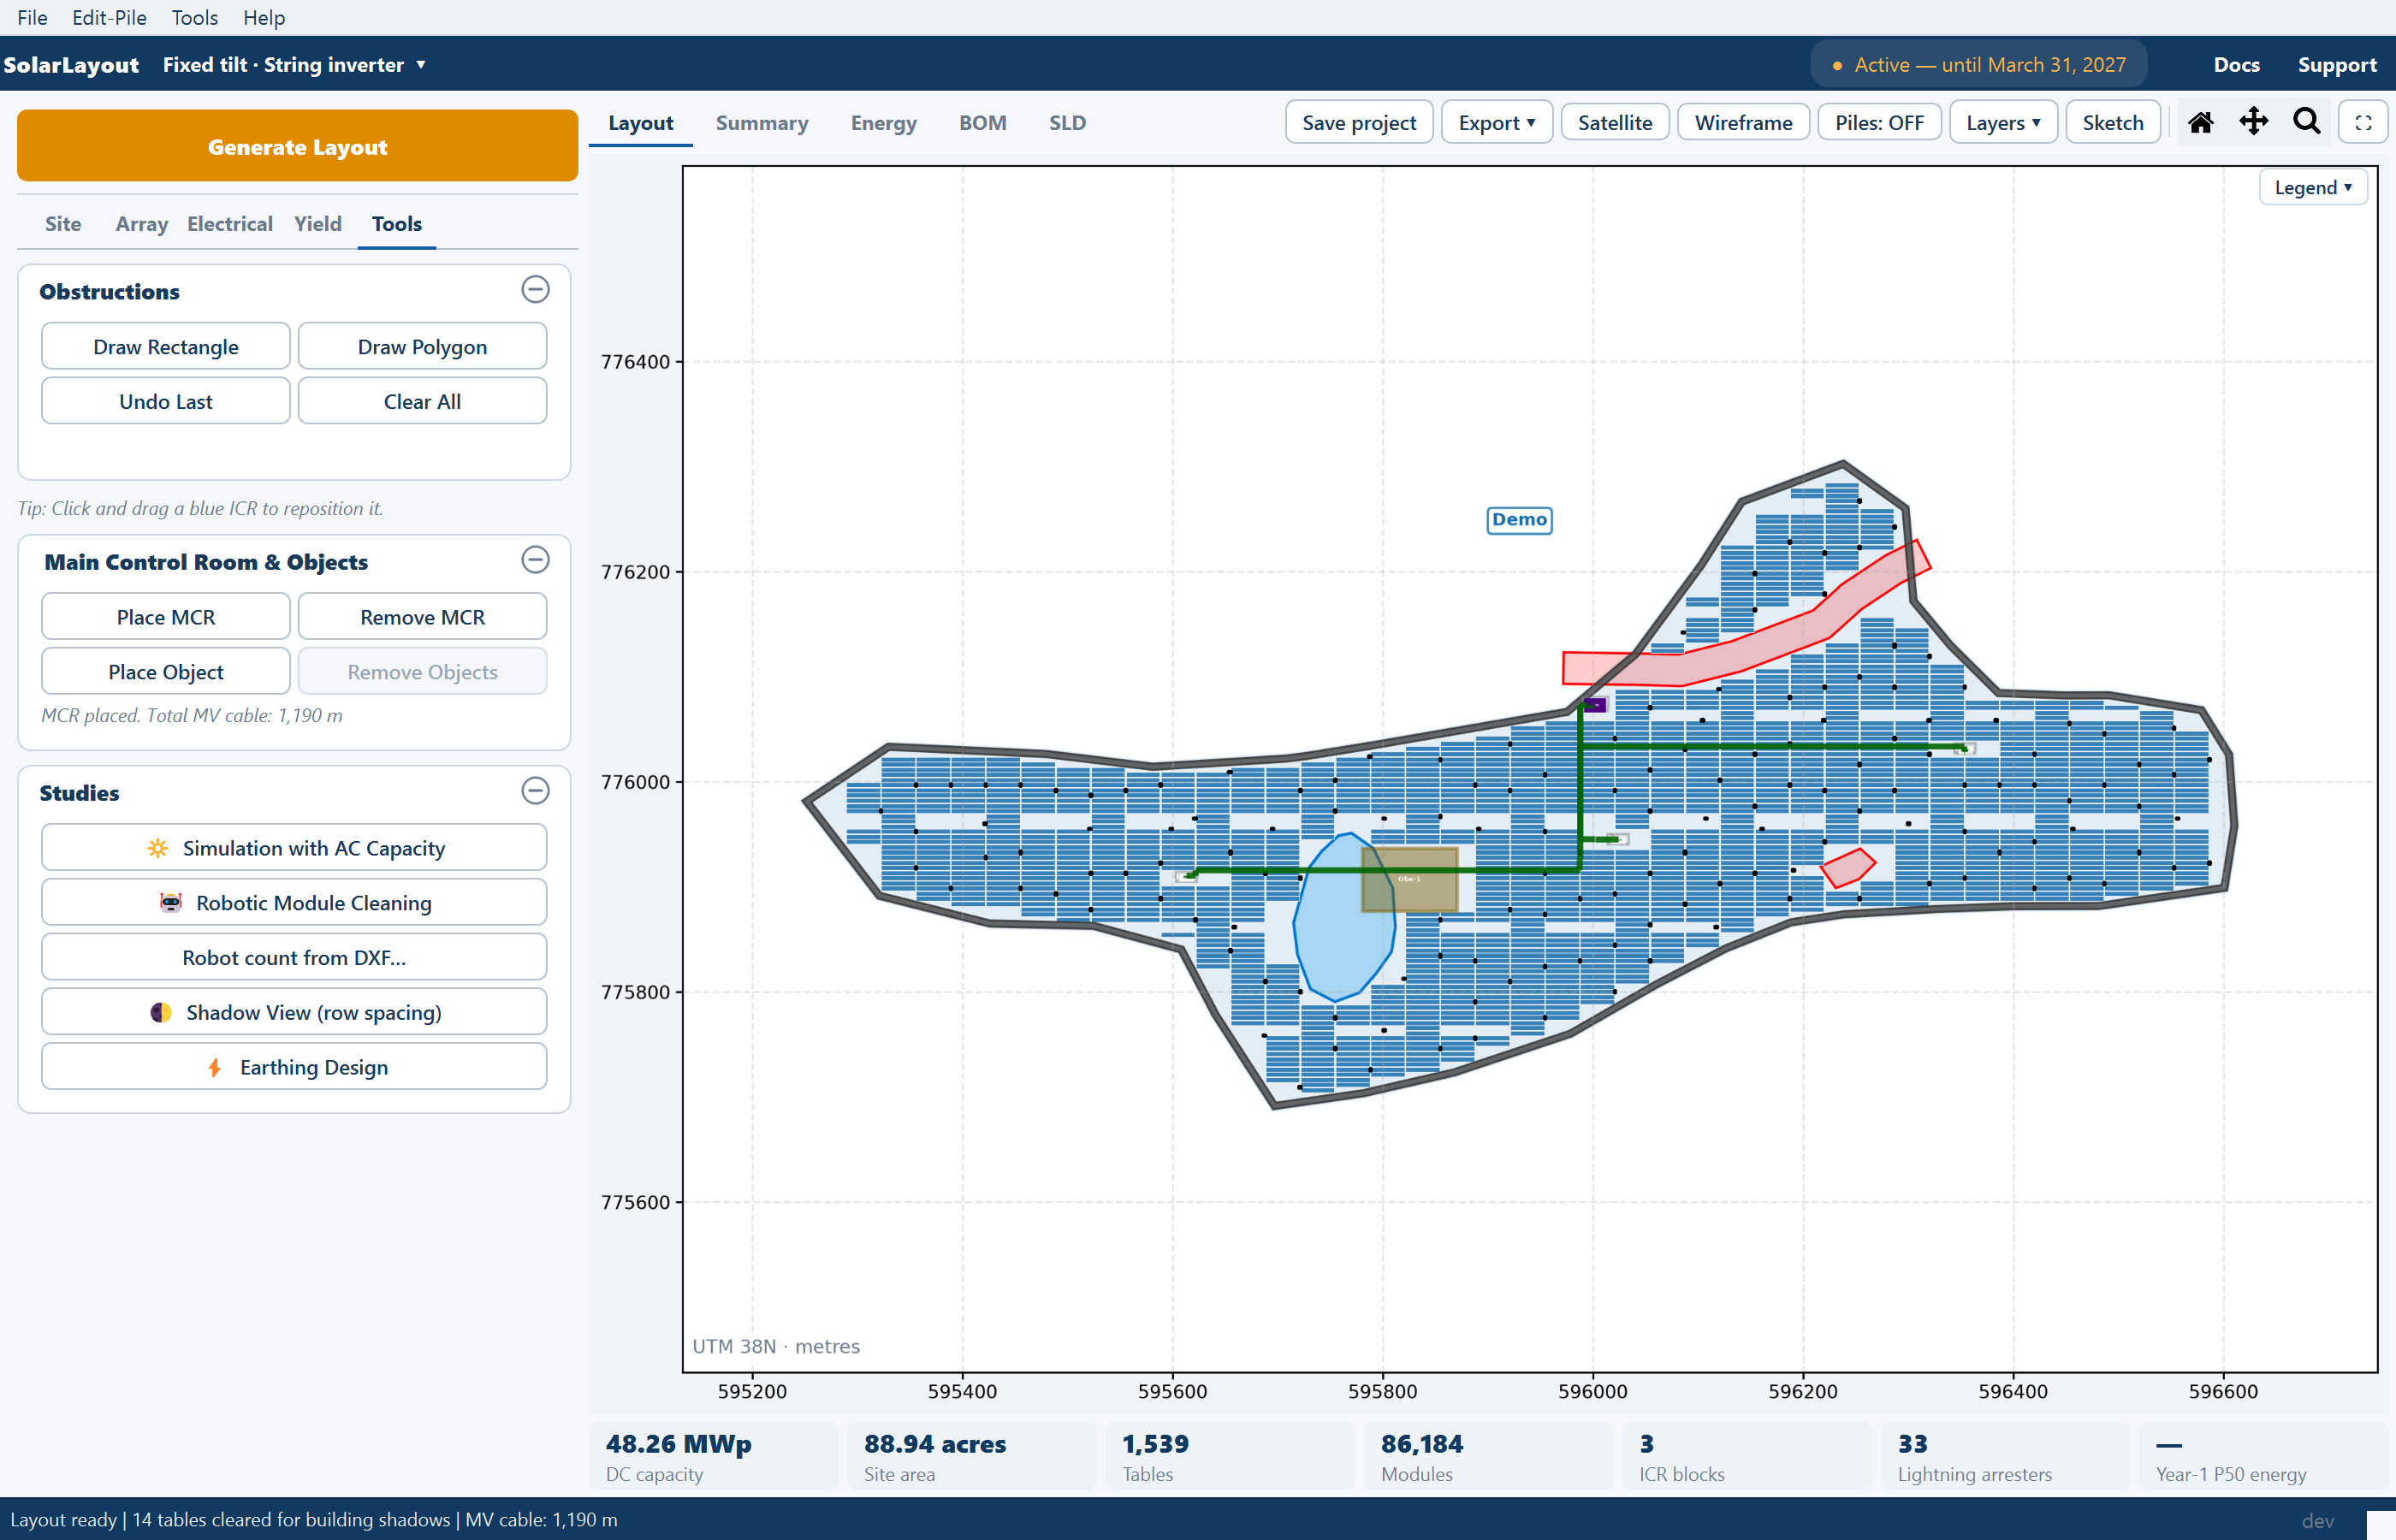
The Summary view reports the medium-voltage conductor length in MV cable (m).
Trenches and conductors are different totals
This is the distinction to carry into a cost estimate, and the Summary view reports both so you never have to guess which one a number is.
- A conductor total is the length of cable, including the multipliers above: a DC leg counted twice, an AC feeder counted once.
- A trench total is the length of physical trenching — the de-duplicated path length for that cable type. Where several cables share one route, the trench is counted once.
So the conductor total is always the larger of the two, often by a lot. Neither number is wrong; they answer different questions. Conductor length prices the cable drum. Trench length prices the excavation, the sand bedding, the tiles and the backfill.
The CABLES group of the Summary view carries them together:
| Summary row | What it reports |
|---|---|
| String DC cable (m) | String cable conductor length |
| AC cable to ICR (m) (string-inverter design) | AC feeder conductor length, inverter to control room |
| DC cable to central inverter (m) (central-inverter design) | DC trunk conductor length, monitoring box to control room |
| MV cable (m) | Medium-voltage conductor length |
| DC trench (m) | DC trench length, de-duplicated |
| AC trench (m) | AC trench length, de-duplicated |
| MV trench (m) | Medium-voltage trench length, de-duplicated |
Every row is defined in Summary rows. The Detailed Project Report carries the inverter and cable summary on its design summary page, broken down per control room; its layout drawing hides the cables. See The project report.
The cable schedule
Export ▾ ▸ Export Cable Schedule (Excel) writes the cabling as a workbook to issue to a contractor: every DC string, every feeder and every collection run, with its length, its current and a conductor size. It is available after any layout that is up to date and has control rooms. Calculate cables is not required: without it the lengths are straight lines between the ends, increased by 15 %, and the sheet says so. Like the other layout exports, it is refused while the layout is out of date. See Out-of-date results.
Choose a name in the Save Cable Schedule (Excel) dialog; the file is an
Excel workbook (.xlsx). The status line then reads "Cable schedule exported
(n ICR-block sheets): …".
One sheet per ICR block
The workbook has one sheet for each ICR block, named ICR-1, ICR-2 and so on. On a site with several plots each sheet name starts with the plot, P1-, P2- and so on. Every sheet opens with three lines:
| Row | What it carries |
|---|---|
| 1 | The title, naming the sheet |
| 2 | The basis in grey italics: the module wattage, Vmp, Imp, modules per string and string voltage; the conductor materials; the drop limits; how the AC feeder current was found; the derating; whether the lengths come from the routed layout or a straight line × 1.15; the transformers' LV voltage; and the MV cable sizes at 33 kV |
| 3 | String-inverter sheets only. The low-voltage AC drop: the plant average against the 1.5 % budget, and how many feeders are above 2.5 % — in bold red when the plant is over budget or any feeder is flagged, grey otherwise |
The plant average on row 3 is weighted by current over every AC feeder in the workbook, all plots included, so it is the same figure on every sheet.
Under them sit three tables, each with a title row and a header row:
| Table | Columns | One row per |
|---|---|---|
| DC String Schedule | String No · From Table/Tracker · Row · Col · Modules/String · To Inverter/SMB · Cores · +ve (m) · -ve (m) · Total (m) · String I (A) · Size (mm2) · %VD | String, named such as R4-C12-S1, to its inverter or SMB, such as ICR1-INV-07 |
| AC Cable Schedule (Inverter - ICR ACCB) — or DC Trunk Schedule (SMB - Central Inverter) in a central-inverter design | Cable No · From · To · Type · Cores · Current (A) · Length (m) · Size (mm2) · %VD · Flag | Inverter feeder to its ACCB (3 cores), or SMB trunk to the central inverter (2 cores) |
| Collection Schedule (ACCB/CINV - IDT - MCR) | Cable No · From · To · Type · kV · Cores · Runs · Current (A) · Length (m) · Size (mm2) · %VD | Each ACCB or central inverter to its transformer; then one medium-voltage row from the block's transformers to the main control room, or to the plot's unit substation |
The collection table follows the grouping on the ACCB & Transformer card: its low-voltage rows appear for every block that has transformers, each 20.0 m long, and its medium-voltage row only once the plot holds a main control room or a unit substation. The medium-voltage row uses the routed length where there is one.
How the conductors are sized
The schedule sizes each kind of run by its own rule:
| Run | Conductor | How the size is chosen |
|---|---|---|
| DC strings | Copper | The smallest size, from 4 mm², that carries the derated current and keeps the drop within 1.5 % |
| DC trunks (central) | Copper | The smallest size that carries the current and keeps the drop within 1.5 % |
| AC feeders (string) | Aluminium, 3 cores | One run of 300 mm², stepped up to 400, 500 or 630 mm² only when 300 mm² cannot carry the current. The drop never changes the size; it is reported and flagged instead |
| Collection runs | Aluminium | Parallel runs of 300 or 400 mm², the fewest runs that carry the current and keep the drop within 2.0 % |
The string current comes from the module file (Vmp and Imp); without one the schedule assumes 42 V and works the current out from the wattage. The AC feeder current is the inverter file's maximum AC current; failing that, its maximum AC power at the LV voltage; and with no inverter file, each inverter's DC capacity. The LV voltage is the inverter file's output voltage, or 800 V (string) / 690 V (central) without one. The derating factor is 0.9, the power factor 1.0, and medium voltage is 33 kV in the schedule whatever the card's MV voltage says.
The Flag column of the AC table marks the feeders to look at: stepped up to … mm2, no single run carries … A (the size is then 630 mm²), and drop … % > 2.5 %. The same sizing drives the feeder and drop checks among the design warnings.
Changing the layout after a run
Cable lengths are an output of a small number of decisions. If a total looks wrong, these are the fields to look at rather than the routing:
| Input | What it changes | Effect on the cabling |
|---|---|---|
| ICR Block | The number of control rooms and each one's rating | More, smaller rooms shorten the AC feeders and add branches to the medium-voltage network, each with its own termination allowance |
| Max strings per inverter (or per SMB) | The number of inverters or monitoring boxes | Fewer, larger units mean longer string runs to reach each one; more, smaller units mean shorter string runs and more collection points |
| Row pitch | The spacing of the rows | Routes run along and across the row grid, so a wider pitch tends to lengthen the north–south legs of the runs |
| The main control room position | The destination of the medium-voltage network | Sets the whole medium-voltage length. Place it where the export actually leaves the site |
| The three DC allowances | The string-cable total only | Lead, return run and slack are added to the routed string length; they never touch the AC, trunk or MV figures |
Edits on the canvas — drawing an obstruction, Undo Last, Clear All, dragging an ICR — re-place the inverters and, with Calculate cables on, route the cables again.
Trench totals are worked out at the end of a full cable run — Generate Layout, or leaving Sketch Mode after a change. After a canvas edit the cable rows of the Summary view are measured again, but the DC / AC trench rows still show the figures from the last full run. Generate again before quoting trench lengths.
One cable run at a time
While an edit's cables are being routed, the Obstructions and Main Control Room & Objects cards on the Tools tab are unavailable, and the status line reads "Cables are being routed… Obstruction, MCR and object tools and ICR dragging are back when they finish." Dragging an ICR does nothing while any cable run is going, including the one that follows a Generate.
A change you make meanwhile — another edit, Generate Layout, leaving Sketch Mode — is not lost: the status reads "Cables are being routed… Your change will be applied as soon as they finish.", and waiting changes run in order once the current run ends. A second move of the same object replaces the waiting one. Closing the window during an edit's cable run waits for it too, and the window closes itself when the routing finishes.
Drawing and deleting trenches by hand
Automatic routing does not know about the access track you intend to dig along, or the crossing you have already agreed with a landowner. Sketch Mode's CABLE TRENCHES group lets you route by hand.
| Tool | What it does |
|---|---|
| 🟢 DC Trench | Click vertices, right-click to finish: a DC trench |
| 🔴 AC Trench | Click vertices, right-click to finish: an AC trench — in a central-inverter design, the DC trunk from the SMBs to the central inverter |
| 🟩 MV Trench | Click vertices, right-click to finish: a medium-voltage trench |
| ✂ Del Trench | Click any cable trench — automatic or hand-drawn — to delete it |
Switch 🧲 Snap and ⊾ Ortho on in the contextual bar before drawing a trench you intend to build from. See Sketch Mode.
How long a trench edit lasts
- A drawn trench replaces every automatic run of its type in the plot, and both the cable and the trench totals for that type then come from what you drew.
- It survives leaving Sketch Mode, and is saved with the project.
- It does not survive Generate Layout. Generate lays the plant out and routes every cable afresh, and the hand-drawn trenches are dropped.
- Deleting an automatic run does not last. With Calculate cables on, leaving Sketch Mode routes every cable again, and the deleted run comes back.
No control switches trench edits on or off. Draw trenches last, after the final Generate, and save the project first so the automatically routed design survives as a file of its own.
Seeing cables on the plot
The three cable rows of the Layers ▾ popover in the Layout view are OFF by default, even after a run that routed them, and the first two are enabled only when cables were calculated. Switch on the ones you want:
| Layers row | Default | Draws |
|---|---|---|
| DC string cables (Tbl→Inv) | OFF | String cables from the tables to the inverters or monitoring boxes — green |
| AC cables (Inv→ICR) — DC cables (SMB→CI) in a central-inverter design | OFF | AC feeders to the control rooms — red — or the DC trunks in a central-inverter design |
| MV cables (ICR→MCR) | OFF | Medium-voltage runs to the main control room — dark green. Needs the main control room placed and cables calculated |
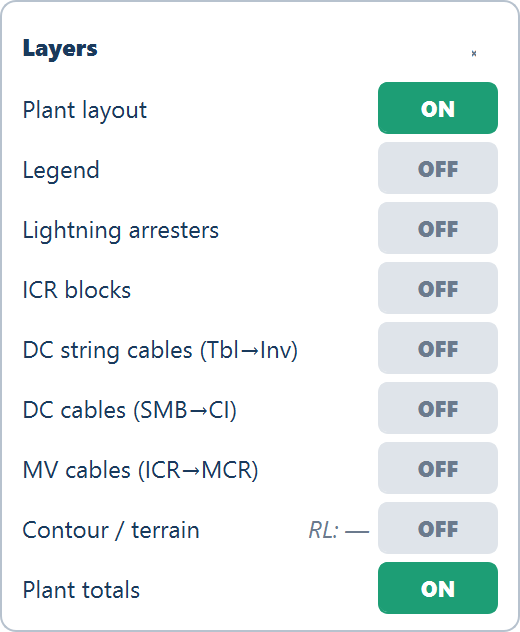
Turning all three on at once over a whole plant is unreadable. Zoom into one block with the mouse wheel, or switch Plant layout off in the same popover to read the cabling on its own. See Views for the popover and the rest of the Layout view's tools.
What reaches the drawing
The CAD export writes each cable type and each trench type to its own layer —
DC_CABLES, AC_CABLES, MV_CABLES, and DC_TRENCH, AC_TRENCH,
MV_TRENCH — and the cable layers are present only when cable calculation
was on for the run. The trench layers carry the automatic and the hand-drawn
trenches alike. Cables are exported to the Google Earth file as well. See
CAD export.
Where to go next
Cables
The Calculate cables option, the performance notice and the three allowances
ACCB and transformers
The grouping the collection table of the cable schedule follows
Inverter control rooms
How many there are, where they sit, and moving one
Design warnings
The cable and control-room checks run on every layout
Obstructions
Every kind of ground kept clear of modules — water, buildings, line corridors, terrain, shadows — and how to draw an exclusion by hand from the Tools tab or in Sketch Mode.
Multi-plot sites
One boundary file can hold several separate plant boundaries. Each becomes its own plant, with its own column in the Summary view and its own unit substation.